You’ve committed to a trade show. The stand is booked, the date is locked in, and someone on the team is asking what signage you’re ordering. That’s usually the moment event printing becomes a problem to solve.
Getting it right isn’t complicated, but it does take planning. This guide walks through the main large format printing products businesses use at trade shows and corporate events, realistic lead times for a Melbourne job, what your designer needs to know, and what to check before you sign off. It draws on Elgin Printing’s experience producing event signage from our Carlton workshop since 1965.
Event signage falls into a few broad categories. Most jobs combine two or three of these, and the choice depends on how long you need the signage to last, where it’ll sit, and whether you plan to reuse it. The table below gives an at-a-glance comparison, and the notes underneath go into each product in more detail.
| Product | Best for | Typical size | Notes |
|---|---|---|---|
| Pull-up banner | Registration, breakout rooms, retail promotions | 850 x 2000mm (standard) | Reusable across many events with proper storage |
| Hanging or ceiling banner | Overhead identification in large exhibition halls | Custom to venue ceiling height | Usually printed on fabric; reusable |
| Foam board display | Short-term indoor signage, information boards | Up to 2400 x 1200mm | Lightweight, typically single-event use |
| Corflute sign | Durable indoor or outdoor event signage | Custom | Weather-resistant, reusable |
| Fabric display or media wall | Branded backdrops, photo walls, stand walls | Frame-dependent (1.5–4m wide common) | Reusable, fabric skin is washable, packs flat |
| Wall and floor graphics | Stand wraps, decals, temporary direction signage | Custom to surface | Single-use adhesive, peels off cleanly |
The workhorse of trade show signage. A pull-up banner (sometimes called a roll-up or retractable banner) is a single printed panel that pulls up from a cassette base and stands on its own. The industry standard is 850mm wide by 2000mm high, though 800mm and 1000mm widths are also common. They pack down into a carry bag weighing around 3kg, which matters if you’re hauling multiple banners between events. Properly stored, rolled down into the cassette and out of direct sun, a pull-up banner will last through dozens of events.
In large halls, overhead identification helps visitors find you from across the room. Hanging banners are usually printed on fabric and suspended from a truss or ceiling grid. They’re less portable than pull-ups but far more visible in crowded venues, and a good fit for exhibition halls, conferences with multiple stands, and product launches where vertical space matters.
Rigid printed boards, either lightweight foam board for indoor use or weather-resistant corflute for anywhere the signage might get knocked about. Our earlier guide on foam board vs corflute vs aluminium covers the material choice in detail. For short-run indoor event work, foam board is usually the right call. For signage that needs to survive a week outdoors or take a few knocks, corflute or aluminium.
In large halls, overhead identification helps visitors find you from across the room. Hanging banners are usually printed on fabric and suspended from a truss or ceiling grid. They’re less portable than pull-ups but far more visible in crowded venues, and a good fit for exhibition halls, conferences with multiple stands, and product launches where vertical space matters.
Printed adhesive vinyl that applies directly to walls, windows or floors. Short-term versions peel off cleanly after the event without leaving residue. Full-colour stand wraps are possible if your venue allows them, and floor decals are useful for directional signage and branded zones.
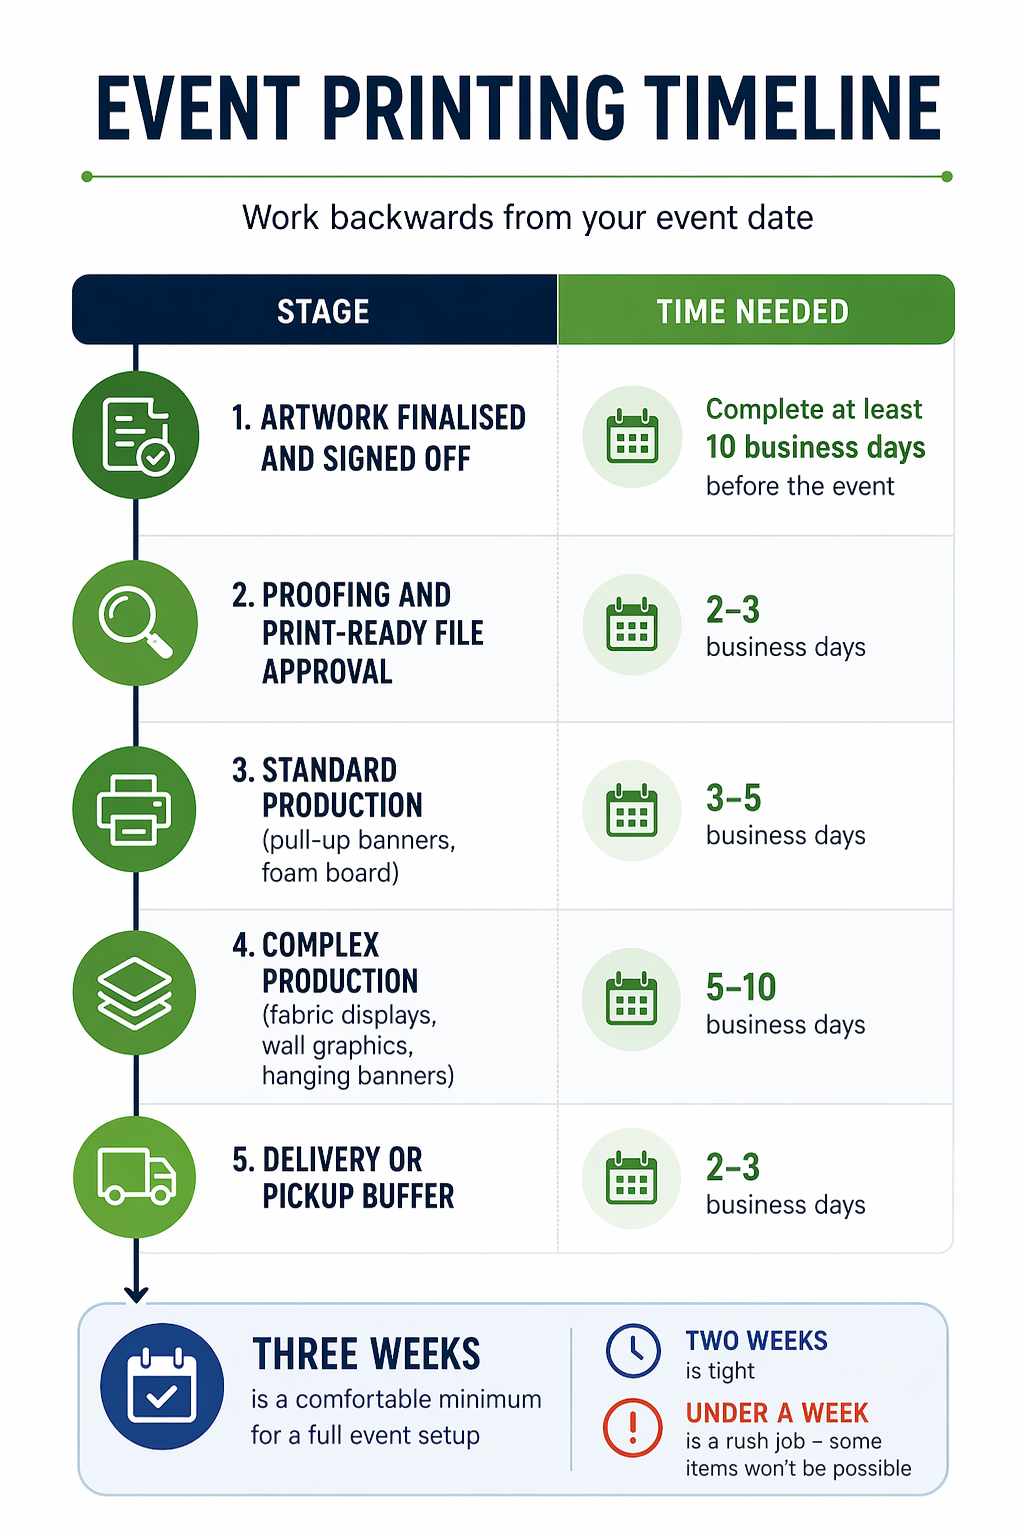
Work backwards from the event date. A realistic production schedule looks something like this:
| Stage | Time needed |
|---|---|
| Artwork finalised and signed off | Complete at least 10 business days before the event |
| Proofing and print-ready file approval | 2–3 business days |
| Standard production (pull-up banners, foam board) | 3–5 business days |
| Complex production (fabric displays, wall graphics, hanging banners) | 5–10 business days |
| Delivery or pickup buffer | 2–3 business days |
Three weeks is a comfortable minimum for a full event setup. Two weeks is tight. Under a week is a rush job, and some items won’t be possible at all in that timeframe.
Rush jobs are usually possible, but they cost more and limit your options. If you’ve had to pull a stand together at short notice, call early and be honest about the deadline. A good printer will tell you what’s realistic and what isn’t, rather than quoting a date they can’t meet. A rough rule: the time you save by rushing production is almost always less than the time you lose when the proofing process would have caught something.
Large format has different rules from standard A4 printing. The scale changes what matters. The table below covers the specifications your designer needs to know before they start building artwork.
| Specification | Requirement | Why it matters |
|---|---|---|
| Resolution | 150 DPI for close viewing (pull-ups, displays), 100 DPI for 3m+ distance, at final output size | Images that look crisp on screen can pixellate at 2m wide |
| Colour mode | CMYK (not RGB) | Screen colours shift in print, particularly bright blues and reds |
| Bleed | 5–10mm (compared to 3mm for A4 work) | Finishing tolerances are larger on a 2m panel than on a page |
| Safe zone | Keep important text and logos 20mm from any edge; keep key messaging 65mm above the bottom of a pull-up banner | Cassette bases hide the lower strip of pull-up artwork |
| File format | Print-ready PDF with fonts embedded and images at full resolution | Reliable across printers and systems; avoids last-minute font substitutions |
Supply artwork at final output size wherever possible, not scaled up from an A4 original. If your designer works in Photoshop or Illustrator, expect your printer to ask for an exported PDF. InDesign packages with linked files are also fine for most commercial printers. If brand colours are critical, flag any specific Pantones upfront and ask about colour matching before the job goes to press.
Once the proof arrives, work through this checklist before you give the green light:
One practical benefit of in-house production: at Elgin, printing, cutting, laminating and finishing all happen under one roof in Carlton. Nothing gets outsourced. That means if the proof shows a colour issue at 9am, we can adjust and re-run the same day. That’s harder to do when large format production is sent out to a third party.
Most event printing problems trace back to one thing: the conversation with the printer started too late. By the time the stand is booked and the agenda is locked in, your printer should already know roughly what you’ll need. A 15-minute call early in the planning cycle saves rushed decisions later and usually saves money on expedited production.
If you’ve got an event coming up, talk to Elgin Printing about your large format printing needs. We handle event signage for Melbourne businesses every week: trade shows, conferences, product launches, retail activations. We can help you plan what you need, what it’ll cost, and when to have your artwork ready.